How would I use a Custom Email Address?
Your Deskpro Cloud Helpdesk provides built-in Email Accounts in the format contact@yourcompany.deskpro.com.
However, you can use any Email Address to receive Tickets; e.g. an existing support address like contact@yourcompany.com.
How do I set up a Custom Email Address?
Step 1: Enter details for the Address
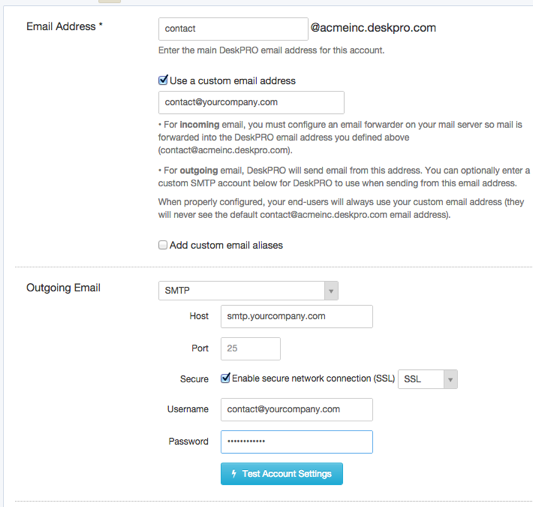
Your Custom Address will be linked to a built-in @yourcompany.deskpro.com Email Account.
In Admin > Tickets > Email Accounts, select an Email Account and check the 'Use a custom email address' option.
Enter the Custom Email Address.

Step 2: Forward Email from the Custom Address to the built-in Account
You need to configure the Custom Email Account to forward mail to the corresponding built-in Email Address. Once mail has been forwarded to an @yourcompany.deskpro.com Email Address, Deskpro will process it as tickets.
If you don't know how to set up forwarding like this, speak to the administrator of your email server, or consult the help information from your email service provider.
Here's how to do it for Gmail, Google Apps, Outlook and Yahoo.
Step 3: Send Mail from your Custom Email Address
Now that Tickets are being received from the Custom Email Address, you want to make sure that Outgoing Emails such as Ticket Notifications are sent from the Address. Under 'Outgoing Email' select one of these options:
Step 3a - Send mail through Deskpro
You can send messages directly from Deskpro servers. This will work straight away. As the email is not coming from your own server, some email providers and ISPs may mark it as spam. To let them know that Deskpro is authorized to send email on your behalf, you should follow these instructions to set up SPF and DKIM.
Step 3b - Send email through SMTP
You can send messages from your own SMTP server. Enter the SMTP settings.
Step 3c - Send email through a Gmail account
If your Custom Address is managed through Gmail or Google Apps, you can just select this option and enter the account password.
Note that if you have 2-step verification enabled, you will need to set up an App password.


Commentaire (1)